Recent Posts
Prevent Flooding in Your Home with Spring Cleaning Tips | SERVPRO of Mid-City San Diego
4/3/2025 (Permalink)
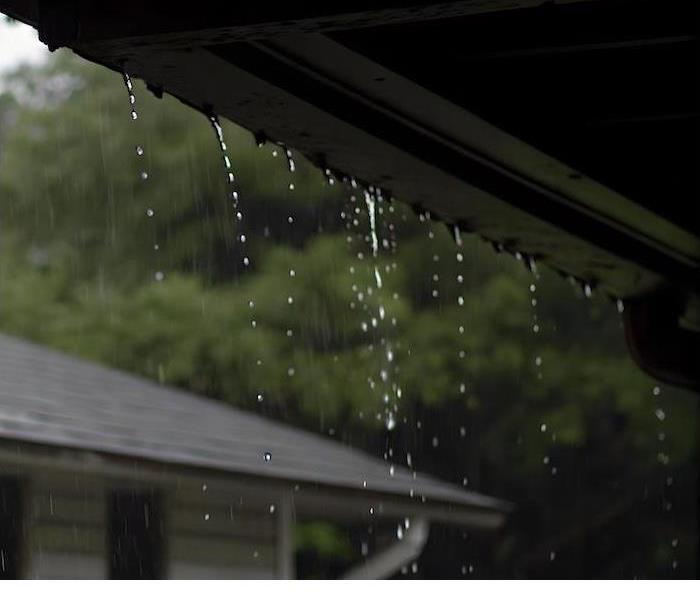 Spring cleaning isn't just about freshening up your space—it’s a chance to protect your home from flooding risks!
Springtime in San Diego is the perfect season to give your home a fresh start. As the weather warms up and we start seeing a bit more rain, it’s the ideal moment to tackle some crucial spring cleaning tasks that can help prevent flooding in your home. Whether it’s from leaking appliances or plumbing failures, flood risks can sneak up on homeowners. Here’s how you can stay ahead of the game and protect your home from costly water damage.
Why Spring Cleaning Matters for Flood PreventionSpring cleaning isn’t just about decluttering and dusting off the shelves. It's also an excellent opportunity to inspect key areas in your home that could lead to flooding if left unchecked. In San Diego, while we don't face the heavy rainfall of other regions, we still experience periodic showers during the spring season, which can expose underlying plumbing or appliance issues.
To start, focus on inspecting appliances that rely on water, like your dishwasher, washing machine, and refrigerator. Look for signs of leaks, rust, or worn-out hoses that could cause trouble later on. It’s also a good idea to check your water heater, especially if it's older—corroded tanks can easily fail, causing water damage throughout your home.
Be Proactive About Plumbing IssuesOne of the most common causes of indoor flooding is plumbing problems. Pipes can leak or burst due to wear and tear, or even tree root intrusion. Since these issues can often go unnoticed until it’s too late, make sure to check for any damp spots, mold growth, or unusual odors near your pipes. Don’t forget about outdoor pipes, gutters, and drains either—spring showers can clog them up, leading to water backup into your home.
Another area to check is your sump pump, if you have one. Ensuring that it’s functioning properly is essential during rainy months to keep water from pooling in your basement or crawl space.
San Diego’s Spring Rain and Flooding RisksWhile San Diego isn't known for severe spring weather, it’s important to be aware of the region’s typical rain patterns. San Diego usually receives its heaviest rainfall between February and April, so take advantage of this time to check for any flood-prone areas around your home. Even minor flooding can cause significant water damage if left unchecked, especially when coupled with poor drainage systems.
How SERVPRO® of Mid-City San Diego Can HelpAt SERVPRO of Mid-City San Diego, we understand the importance of staying proactive when it comes to water damage prevention. By catching potential issues early, you can avoid the stress and expense of dealing with flooding later on. If you do find yourself dealing with water damage or need help inspecting your home, our team is here to help. Contact us today to schedule a consultation, and let us help you protect your home from flooding risks.
Ready to Prevent Flooding in Your Home?Spring cleaning isn't just about freshening up your space—it’s a chance to protect your home from flooding risks! Schedule a home inspection with SERVPRO of Mid-City San Diego today.
Spring Cleaning for Your Business: The SERVPRO® Way | SERVPRO of Mid-City San Diego
3/24/2025 (Permalink)
 Don’t wait—contact us today to schedule your spring cleaning. Learn more about our services and get a free quote here!
Why Spring Cleaning Matters for Business OwnersAs the flowers bloom and the sun shines brighter in San Diego, spring is the perfect time to refresh and rejuvenate your business space. The season brings a natural sense of renewal, and it’s an ideal opportunity for business owners to tackle the cleaning and maintenance tasks that get put on the back burner during the busy months. At SERVPRO of Mid-City San Diego, we understand the importance of a clean, welcoming environment—not just for the aesthetic, but for your employees’ health and your customers’ experience.
The Impact of Spring Weather on Your BusinessSpring in San Diego is synonymous with mild, pleasant weather. Temperatures typically range from the mid-60s to mid-70s, making it a great time for outdoor activities and events. This shift in weather can influence consumer behavior, with more people venturing out for shopping, dining, and entertainment. As your business gets busier, you might notice more foot traffic. That’s why now is the time to invest in spring cleaning services.
Spring also brings increased humidity, which can cause dust and debris to settle into corners and crevices. This is especially true in areas with high foot traffic or open windows. With SERVPRO of Mid-City San Diego’s expert cleaning services, you can ensure your space stays pristine, even as nature works its magic.
Spring Cleaning TrendsSpring cleaning is a time-honored tradition, but consumer trends in San Diego reflect a few key shifts. People are becoming more conscious of hygiene and cleanliness, especially in public spaces. This means businesses like yours must stay ahead of the curve by maintaining a high standard of cleanliness—not just for aesthetics, but to meet the rising expectations of customers who are more health-conscious than ever.
A clean, inviting space also enhances your brand’s reputation. It signals to your customers that you care about the details and their well-being, which helps build loyalty and trust. When the weather is perfect and your space looks spotless, you're setting the stage for more successful interactions and transactions.
Let SERVPRO of Mid-City San Diego Help You Tackle Spring CleaningIf you’re ready to give your business a spring refresh, SERVPRO of Mid-City San Diego is here to help. Our professional team specializes in deep cleaning and sanitization, making your commercial space look and feel like new. We’re ready to help you make the most of this season by handling the cleaning so you can focus on growing your business.
Don’t wait—contact us today to schedule your spring cleaning. Learn more about our services and get a free quote here!
Prevent Mold and Avoid Damage: Simple Tips to Follow Year-Round | SERVPRO of Mid-City San Diego
3/24/2025 (Permalink)
 Contact SERVPRO of Mid-City San Diego now to learn more about how we can help protect your home from mold!
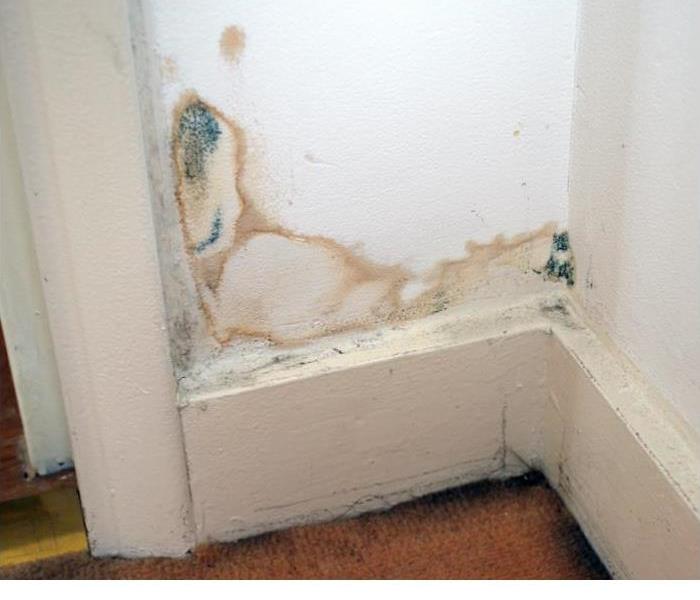
Mold can be a pesky problem for homeowners in San Diego, especially when the weather shifts throughout the year. SERVPRO of Mid-City San Diego knows just how important it is to prevent mold growth before it becomes a costly and time-consuming issue. With some simple tips and a little proactive care, you can keep your home safe from mold damage all year long!
How Seasonal Weather Affects Mold GrowthIn San Diego, we’re fortunate to enjoy mild weather, but it can also create the perfect environment for mold. During the rainy season, especially in winter and early spring, increased humidity can cause moisture to build up inside your home. If that moisture isn’t properly managed, mold can start to grow, typically in areas like bathrooms, kitchens, and basements where there’s already plenty of moisture.
Simple Tips to Prevent Mold in Your HomeControl Indoor Humidity
San Diego’s seasonal humidity can make a perfect breeding ground for mold, so controlling moisture levels inside your home is key. Use dehumidifiers, especially during the wetter months, to keep the air dry. You can also make sure your air conditioner is functioning properly to help with humidity control year-round.
Ensure Proper Ventilation
Ensure that your home has proper ventilation, especially in rooms that tend to trap moisture, like bathrooms and laundry rooms. Always use exhaust fans when cooking or showering, and if possible, open windows to allow fresh air to circulate. This is a great way to prevent mold buildup!
Fix Leaks Promptly
Any leaks in your roof, windows, or plumbing need to be fixed quickly. Even a small leak can lead to significant mold problems if left unaddressed. San Diego’s occasional heavy rains can exacerbate these issues, so be sure to inspect your home after storms for any signs of water damage.
Regularly Inspect Your Home
Make it a habit to regularly inspect areas like crawl spaces, basements, and under sinks. If you catch moisture or mold early, you can prevent major damage and mold problems down the line.
When to Call SERVPRO of Mid-City San DiegoIf you notice mold growth, it’s important to take action immediately. SERVPRO of Mid-City San Diego offers professional mold remediation services to ensure your home stays safe and dry. While prevention is important, sometimes mold can sneak up on you, and that’s where we come in. Don’t wait for mold to cause further damage — get in touch with us today!
Contact SERVPRO of Mid-City San Diego now to learn more about how we can help protect your home from mold!
Preventing Water Damage in Your Home | SERVPRO of Mid-City San Diego
2/18/2025 (Permalink)
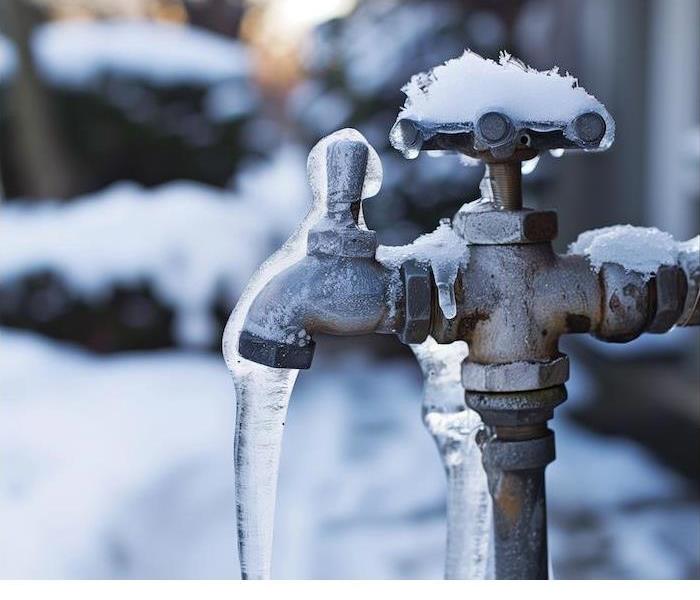
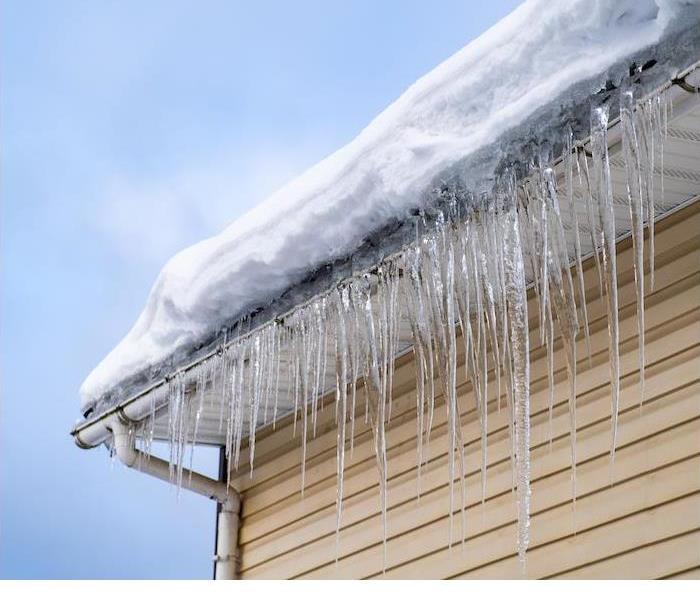
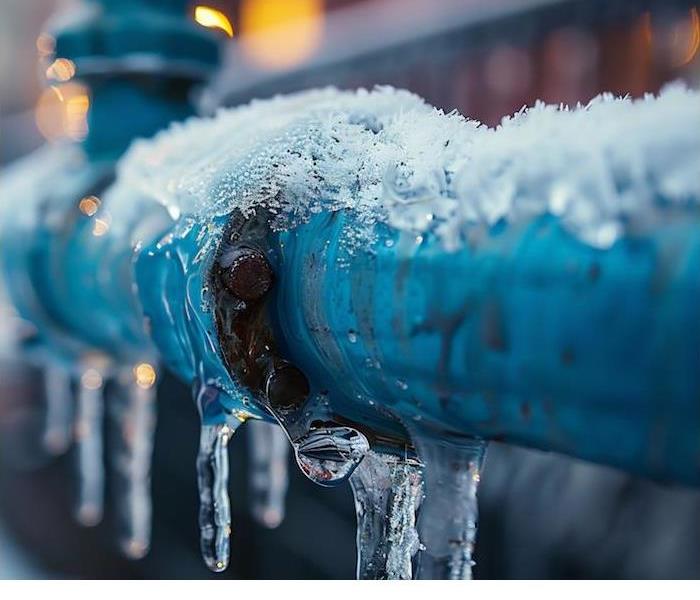 Protect Your Pipes from Freezing This Winter
As winter approaches in San Diego, it’s important to take steps to protect your home from the potential dangers of water damage. While the region doesn’t experience extreme cold like other parts of the country, the risk of frozen pipes and heavy rain can still lead to costly and stressful problems. SERVPRO of Mid-City San Diego is here to help homeowners understand how to prevent water damage from internal sources like pipes, appliances, and more.
Protect Your Pipes from Freezing This WinterOne of the most common causes of water damage in the winter is frozen pipes. While San Diego doesn’t often face sub-zero temperatures, it can still get chilly enough for water in unprotected pipes to freeze, causing them to burst. When this happens, the resulting water leak can cause significant damage to your home’s structure, flooring, and belongings.
To prevent this, consider insulating pipes in unheated areas like attics, garages, or basements. If you have exposed pipes on exterior walls, use pipe insulation or heat tape to keep them warm. Also, remember to keep the thermostat set at a steady temperature, especially when you’re away from home, as fluctuating temperatures can increase the risk of freezing.
Keep Your Appliances in CheckLeaking appliances can also contribute to water damage inside your home, especially during the winter months when we tend to use our heaters, dishwashers, washing machines, and refrigerators more frequently. Regularly inspect hoses and connections for any signs of wear and tear, especially around your dishwasher, washing machine, and water heater. A small leak can quickly turn into a large problem if not addressed.
It’s also a good idea to check for any signs of standing water under appliances and clean out any clogged drains. Servicing your appliances regularly ensures they run efficiently and reduces the risk of leaks that could cause significant water damage.
Prepare for Heavy RainfallWhile San Diego might not face the same level of rainfall as other regions, the occasional heavy storm can still overwhelm gutters and drains, leading to water damage. Clear your gutters and downspouts of debris to ensure water flows freely and doesn’t back up onto your roof or into your walls. Also, check for cracks in windows and doors that could allow rainwater to seep in and damage your home’s interior.
By taking a few simple steps, you can prevent water damage from internal sources like pipes and appliances. Regular maintenance and quick attention to leaks or potential issues will save you from major repair costs in the future.
SERVPRO of Mid-City San Diego is here to help with any water damage issues that arise. If you experience any leaks, frozen pipes, or water damage from appliances, don’t hesitate to call us. We offer expert restoration services to get your home back to normal.
Visit SERVPRO of Mid-City San Diego to learn more!
How to Quickly Respond to Plumbing Failures | SERVPRO of Mid-City San Diego
2/18/2025 (Permalink)
 Plumbing failures can happen at any time and can disrupt your business operations, causing costly damage.
Proactive Measures to Prevent Plumbing IssuesPlumbing failures can happen at any time and can disrupt your business operations, causing costly damage. As a business owner in San Diego, it’s crucial to understand how to prevent plumbing issues and how to respond when they occur. With the potential for unexpected plumbing disasters year-round, staying prepared is essential.
Regular Plumbing InspectionsThe best way to avoid plumbing failures is through routine inspections. Hire a professional plumber to check your pipes, drains, and fixtures regularly. A quick inspection can identify early signs of wear, leaks, or blockages, saving you from larger, more costly issues down the road. If you operate in a space with older plumbing, proactive maintenance becomes even more critical.
Proper Drainage and Water ManagementEnsure that all areas prone to water exposure—like kitchens, bathrooms, and basements—have proper drainage and are regularly cleaned. Clogs are a common cause of plumbing failures, and they can often be avoided by keeping drains clear. Encourage your employees to dispose of waste properly, and make sure your business is equipped with functioning sump pumps or drainage systems.
How to Respond When Plumbing FailsUnfortunately, even with preventive measures in place, plumbing failures can still occur. If disaster strikes, quick action is key. The longer you wait to address the problem, the more extensive the damage will be. Here’s how to respond:
- Shut Off the Water Supply: Immediately turn off the main water supply to prevent further flooding or damage. Knowing where your water shut-off valve is located is essential for quick response.
- Assess the Damage: If possible, assess the severity of the plumbing issue. Is it a small leak, or is the damage more widespread? This will help you determine the next steps.
- Contact a Professional: When plumbing failures happen, it’s best to contact experts like SERVPRO of Mid-City San Diego. Our team specializes in fast response times to minimize damage and restore your business space. We’ll take care of the water damage, so you can focus on running your business.
Frozen Pipes in San Diego? It Can Happen!While San Diego’s winter temperatures rarely reach freezing, there is still a chance for freezing pipes in some areas, especially in higher elevations or poorly insulated spaces. To prevent this, make sure your pipes are properly insulated, and keep temperatures regulated in areas where water lines are exposed to the cold. Even if the temperatures dip below freezing for a short period, taking precautions can help you avoid damage.
Ready to Act? Contact SERVPRO of Mid-City San Diego!When plumbing failures strike, don’t wait for the damage to escalate. Contact SERVPRO of Mid-City San Diego for fast, reliable water damage cleanup and restoration services. Our team is here to help, 24⁄7.
Get in touch with us today!
Preventing Fires in Your Business | SERVPRO of Mid-City San Diego
2/18/2025 (Permalink)
 Don’t wait for the unexpected—be proactive about your fire prevention strategy today!
Why Fire Prevention is Crucial for San Diego Business OwnersAs a business owner in San Diego, preventing fires in your workplace should be one of your top priorities. Commercial fires can be devastating—damaging property, disrupting operations, and causing financial strain. According to recent statistics, over the past decade, San Diego has experienced a significant number of commercial fires, with 2023 seeing a spike due to heightened risks during certain seasons. These fires can be costly, both in terms of repair and potential loss of business revenue.
SERVPRO of Mid-City San Diego understands the unique fire risks businesses face. With our comprehensive fire prevention tips, you can keep your property safe and ensure your operations stay on track, no matter the season.
Tips to Keep Your Business Safe from Fire1. Install and Maintain Smoke DetectorsSmoke detectors are a simple yet effective tool in preventing fire-related damage. Regularly check that all smoke alarms are functioning properly and replace batteries as needed. These devices can provide early warnings and allow for faster evacuation and response.
2. Train Employees on Fire Safety ProceduresYour team plays a crucial role in maintaining a safe environment. Ensure all employees know what to do in the event of a fire. Hold regular fire drills to familiarize everyone with evacuation routes and fire extinguisher locations.
3. Keep Flammable Materials Properly StoredImproper storage of flammable materials is a leading cause of commercial fires. Ensure chemicals, cleaning supplies, and other volatile substances are stored in designated, fire-safe locations. Also, be mindful of the condition of wiring and electrical outlets, as faulty electrical systems are another common fire hazard.
4. Clean and Maintain Your HVAC SystemsDirty HVAC systems can become fire hazards if not properly maintained. Dust and debris can build up, creating a combustible environment. Schedule regular inspections and cleanings to ensure your HVAC system is running safely and efficiently.
Why SERVPRO of Mid-City San Diego is Your Partner in Fire PreventionSERVPRO of Mid-City San Diego is committed to helping local businesses stay safe from fire damage. With our expertise in fire restoration, we offer preventive advice and fast recovery services in case disaster strikes. By following these tips and staying proactive, you can significantly reduce the risk of a fire affecting your business.
Don’t wait for the unexpected—be proactive about your fire prevention strategy today!
For more information on how SERVPRO of Mid-City San Diego can help protect your business, visit our website.
Why Your Business Deserves a Deep Cleaning This Winter | SERVPRO® of Mid-City San Diego
1/7/2025 (Permalink)
 Ensure a clean, welcoming space this winter with SERVPRO of Mid-City San Diego. Contact us today for professional deep cleaning services!
Winter is a bustling time for businesses in San Diego. With the holiday shopping season in full swing, customer foot traffic often increases significantly. Whether you run a retail store, restaurant, or office, maintaining a clean and inviting space is essential to making a positive impression on your customers. That’s why investing in a deep cleaning for your business is more important than ever.
###The Winter Surge: Increased Foot Traffic and Mess
During the winter months, consumerism reaches its peak. Shoppers are out in droves, attending holiday sales, dining out, and preparing for festive gatherings. While this is fantastic for your bottom line, the increased traffic also means more wear and tear on your property.
Dirt and debris get tracked indoors, high-touch areas are used more frequently, and clutter can quickly pile up. This creates a less-than-ideal environment for both customers and employees. A professional deep cleaning can eliminate built-up grime, sanitize frequently used surfaces, and leave your space sparkling clean—ready to impress holiday shoppers and clients alike.
###Why Choose SERVPRO of Mid-City San Diego?
At SERVPRO of Mid-City San Diego, we specialize in deep cleaning services tailored to businesses. Our experienced team uses advanced cleaning techniques and equipment to tackle everything from carpet stains to hard-to-reach dust and dirt.
Deep cleaning not only enhances your business’s appearance but also promotes a healthier environment. With more people indoors during the cooler months, air quality can suffer due to accumulated dust and allergens. Our comprehensive cleaning services ensure your workplace is fresh, clean, and safe for everyone who enters.
###Set Your Business Up for Success
A well-maintained property isn’t just visually appealing; it also boosts your brand’s reputation. Customers notice when a business is clean and organized, and they’re more likely to return and recommend your services. As the year winds down, now is the perfect time to invest in a deep cleaning to start the new year on the right foot.
Let SERVPRO of Mid-City San Diego help you keep your business in top shape this winter. From spotless carpets to pristine restrooms, our expert team has you covered. Take the first step toward a cleaner, healthier, and more welcoming business environment today. Contact SERVPRO of Mid-City San Diego for professional deep cleaning services tailored to your needs.
Learn more and schedule your service here.
How to Prevent Winter Damage to Your Home | SERVPRO of Mid-City San Diego
1/7/2025 (Permalink)
 Prepare your home for winter with SERVPRO of Mid-City San Diego. Protect against rain, cold, and damage—contact us today!
San Diego may be known for its sunny weather, but winter can still bring its share of challenges for homeowners. While heavy snow and freezing temperatures aren’t typical here, the rainy season and cooler temperatures can pose risks to your home if you’re not prepared. Protecting your home from potential winter damage is essential to avoid costly repairs and maintain a safe and comfortable living environment.
##Watch Out for Winter Rain
Winter in San Diego often brings rain, and while it’s a welcome change for our usually dry climate, it can lead to water damage if your home isn’t properly maintained. Clogged gutters are a common culprit during the rainy season. Debris can cause water to overflow, potentially damaging your roof, walls, and foundation. Ensuring your gutters are clean and functioning correctly can make a big difference in preventing water intrusion.
Additionally, inspect your roof for any loose shingles or cracks. Even minor issues can allow water to seep into your home, causing leaks and mold growth. Regular roof maintenance is a simple step that can save you from significant headaches during the rainy months.
##Prepare for Cooler Temperatures
While San Diego winters are mild compared to other parts of the country, cooler nights can still impact your home. Drafty windows and doors can let in cold air, driving up your heating bills and making your home less comfortable. Sealing any gaps and adding weather stripping is a cost-effective way to improve insulation and energy efficiency.
Another area to pay attention to is your plumbing. Although freezing temperatures are rare, exposed pipes in unheated spaces like garages or basements could be at risk if temperatures drop. Wrapping pipes with insulation can prevent potential freezing and bursting, even during an unexpected cold snap.
##Trust SERVPRO of Mid-City San Diego for Winter Prep and Restoration
Preparing your home for winter is essential, but even with the best precautions, unexpected damage can occur. SERVPRO of Mid-City San Diego is here to help®. Whether you’re dealing with water damage from heavy rain or other winter-related issues, our team is ready to restore your home quickly and efficiently.
Stay ahead of potential problems by taking proactive steps to protect your property. And if winter weather leaves you with damage, don’t hesitate to reach out to SERVPRO of Mid-City San Diego.
Visit our website today to learn more about our services and how we can help keep your home safe and sound this winter: SERVPRO of Mid-City San Diego.
Fire Safe in the Kitchen: Cooking Your Holiday Meal Safely | SERVPRO of Mid-City San Diego
12/3/2024 (Permalink)
 Cook safely this holiday season! Follow our tips to prevent kitchen fires and enjoy stress-free celebrations.
The holiday season is here, and kitchens across San Diego are buzzing with festive cheer and favorite recipes. Amid the joy of preparing Christmas feasts, it's important to remember that cooking fires pose significant risks during the holidays. SERVPRO of Mid-City San Diego is here to share fire prevention tips to help keep your celebrations safe and memorable.
Holiday Cooking Hazards to Watch For
Unattended cooking is the leading cause of kitchen fires. During Christmas, with multiple dishes on the stove and larger roasts in the oven, fire safety can sometimes take a backseat. Here are some common holiday cooking risks to keep in mind:
- Overheated grease: Oil can ignite quickly when it gets too hot, spreading flames if not controlled.
- Burnt food or crumbs in the oven: Forgotten food debris can spark flames—clean your oven before cooking.
- Loose clothing near open flames: Sleeves or fabric can catch fire, so opt for fitted clothing while cooking.
By being mindful of these risks, you can create delicious holiday dishes without compromising safety.
Tips for a Fire-Safe Holiday Meal
Keep your holiday cooking safe with these simple yet essential fire prevention tips:
- Stay in the kitchen: Never leave cooking food unattended. If you need to step away, turn off the stove or oven.
- Keep flammable items away from heat: Dish towels, oven mitts, and paper products should stay clear of burners.
- Turn pot handles inward: This reduces the chance of accidental spills and burns.
- Create a “kid-free zone”: Keep children away from hot appliances and cooking areas to ensure their safety.
- Have a fire extinguisher ready: Make sure it’s accessible and you know how to use it properly.
What to Do If a Kitchen Fire Occurs
If a fire does break out, stay calm and act quickly:
- Cover flames with a metal lid or baking sheet to cut off oxygen.
- Avoid water on grease fires, as it can make the flames worse. Instead, use baking soda or a fire extinguisher.
- Evacuate and call 911 if the fire gets out of control.
With these safety tips, you can focus on creating joyful memories and delicious meals this Christmas without worry. And if a mishap occurs, SERVPRO of Mid-City San Diego is ready to help with professional fire damage cleanup and restoration.
Visit our website for more information: SERVPRO of Mid-City San Diego. Stay safe, and have a wonderful holiday season!
Don’t Get Wet: Prepare Your Home for the Possibility of Flooding | SERVPRO of Mid-City San Diego
12/3/2024 (Permalink)
 Protect your San Diego home from flooding—stay prepared with SERVPRO tips and expert services today!
Flooding can be a real concern in our part of San Diego. While the area doesn’t face the constant threat of floods like some parts of the country, heavy rainfall, coastal storms, and infrastructure issues have caused significant flooding in the past. In fact, during periods of intense rainfall, areas around us have seen road closures and property damage due to unexpected floods. Understanding these risks and taking proactive measures can save homeowners a lot of time, stress, and money when the next storm rolls in.
Know the Risks of Flooding
While San Diego is known for its mild, sunny climate, it’s important to recognize that flooding can still occur, especially during the rainy season and as a result of heavy downpours. The Mid-City area is no stranger to flash floods, which can develop quickly and unexpectedly. For example, in recent years, heavy rains have overwhelmed drainage systems, leading to temporary street flooding and water accumulation in low-lying areas.
Understanding these historical trends allows you to better prepare your property for similar conditions in the future. SERVPRO of Mid-City San Diego recommends homeowners stay updated on local weather reports and keep an eye on potential flash flood warnings.
How to Protect Your Home from Flooding
Taking proactive steps to safeguard your home from flooding can make a big difference. Here are some helpful tips:
Inspect Your Property’s Drainage Systems
Make sure your gutters and downspouts are clean and direct water away from your foundation. Clogged gutters can cause rainwater to pool and overflow, leading to damage around your home.
Elevate Important Systems and Valuables
Consider elevating your HVAC system, electrical appliances, and other important equipment in flood-prone areas of your property. If you have valuable items stored in your basement or lower floors, relocate them to higher ground to prevent damage during heavy rains.
Seal Cracks and Install Flood Barriers
Check for cracks in your foundation and seal them properly to prevent water from entering your home. Flood barriers and sandbags can also be effective, especially if your property is located in a low-lying area where water tends to accumulate.
Don’t Wait for the Storm: Be Prepared with SERVPRO of Mid-City San Diego
Flooding can happen when you least expect it, and being prepared is the best defense. SERVPRO of Mid-City San Diego is here to help® you take preventative measures, providing expert advice and services to safeguard your home from potential water damage. Whether you need assistance inspecting your property or help after a flood, we’re ready to respond.
Stay ahead of the storms and make sure your home is protected.
For more information on how SERVPRO of Mid-City San Diego can assist you, visit our website here.


 24/7 Emergency Service